我们已经获取到了屏幕的图像和麦克风的声音,现在就将它们合并一个普通的视频文件。
所谓视频,其实就是一种容器,里面以某种固定的格式放置了视频和音频数据(比如我们前面生成的H264和AAC)。
先来感受一下FLV的格式:
也就是说只需要按上面规定的方式把图像和音频数据写入文件,最后生成的文件就是一个FLV视频文件了。
当然上面只是FLV规范中的一小块而已,完整的规范还有几页。。
我们只是想写个视频文件而已,就要去看如此可怕的规范,实在是说不过去啊。。
而且换个别的格式规范又不一样,又是几页的规范,这还看得过来么。。
所以让我去看这些规范,我是拒绝的。
好在FFMPEG已经把一些主流的视频格式都封装好了,只需要直接调用API就可以了。
使用ffmpeg生成视频可以参考ffmpeg自带的例子output-example.c。这个文件是在ffmpeg第一版中的doc/example里面。
output-example.c使用的都是第一版的API,因此这个文件是无法在2.5.2里面编译通过的。
所以我没有提供完整的工程项目,想运行起来看看效果的,可以自行到ffmpeg官网下载第一版的ffmpeg,参考之前搭建ffmpeg开发环境的方法导入库,然后加上output-example.c的代码编译运行。
output-example.c实现的功能就是凭空造出一个视频文件,完全是无中生有,所以强烈建议初学时按照上面说的方法,运行起来感受一下。
虽然output-example.c里面用了第一版的API,但是整体的思路是值得参考的,只需要简单修改一些API就可以在2.5.2中使用了,因此我们生成视频文件的方式就根据这个例子来改。
首先我们就先来了解下output-example.c的流程:
1.初始化libavcodec库,并注册所有的编解码器和格式。
av_register_all();
2.根据文件名来获取输出文件格式
    fmt = guess_format(NULL, filename, NULL);
    if (!fmt) {
        printf("Could not deduce output format from file extension: using MPEG.
");
        fmt = guess_format("mpeg", NULL, NULL);
}只需要在这里指定文件名,ffmpeg便可以根据后缀名自动识别将要保存的视频格式,前面所说的几页的规范这里只需要一句话就搞定了。。
3.分配一个AVFormatContext
oc = avformat_alloc_context();
4.添加视频和音频流
    if (fmt->video_codec != CODEC_ID_NONE) {
        video_st = add_video_stream(oc, fmt->video_codec);
    }
    if (fmt->audio_codec != CODEC_ID_NONE) {
        audio_st = add_audio_stream(oc, fmt->audio_codec);
    }
这里做的操作其实就是指定了视频编码器和音频编码器的参数:
static AVStream *add_video_stream(AVFormatContext *oc, int codec_id)
{
    AVCodecContext *c;
    AVStream *st;

    st = av_new_stream(oc, 0);
    if (!st) {
        fprintf(stderr, "Could not alloc stream
");
        exit(1);
    }

    c = st->codec;
    c->codec_id = codec_id;
    c->codec_type = CODEC_TYPE_VIDEO;

    /* put sample parameters */
    c->bit_rate = 400000;
    /* resolution must be a multiple of two */
    c->width = 352;
    c->height = 288;
    /* time base: this is the fundamental unit of time (in seconds) in terms
       of which frame timestamps are represented. for fixed-fps content,
       timebase should be 1/framerate and timestamp increments should be
       identically 1. */
    c->time_base.den = STREAM_FRAME_RATE;
    c->time_base.num = 1;
    c->gop_size = 12; /* emit one intra frame every twelve frames at most */
    c->pix_fmt = STREAM_PIX_FMT;
    if (c->codec_id == CODEC_ID_MPEG2VIDEO) {
        /* just for testing, we also add B frames */
        c->max_b_frames = 2;
    }
    if (c->codec_id == CODEC_ID_MPEG1VIDEO){
        /* Needed to avoid using macroblocks in which some coeffs overflow.
           This does not happen with normal video, it just happens here as
           the motion of the chroma plane does not match the luma plane. */
        c->mb_decision=2;
    }
    // some formats want stream headers to be separate
    if(oc->oformat->flags & AVFMT_GLOBALHEADER)
        c->flags |= CODEC_FLAG_GLOBAL_HEADER;

    return st;
}
仔细一看就可以知道这个和之前编码音视频的时候,设置编码参数是一样的。
5.打开音视频编码器
    if (video_st)
        open_video(oc, video_st);
    if (audio_st)
        open_audio(oc, audio_st);
这里执行的操作就是打开编码器和分配一些需要的存储空间了:
static void open_video(AVFormatContext *oc, AVStream *st)
{
    AVCodec *codec;
    AVCodecContext *c;

    c = st->codec;

    /* find the video encoder */
    codec = avcodec_find_encoder(c->codec_id);
    if (!codec) {
        fprintf(stderr, "codec not found
");
        exit(1);
    }

    /* open the codec */
    if (avcodec_open(c, codec) < 0) {
        fprintf(stderr, "could not open codec
");
        exit(1);
    }

    video_outbuf = NULL;
    if (!(oc->oformat->flags & AVFMT_RAWPICTURE)) {
        /* allocate output buffer */
        /* XXX: API change will be done */
        /* buffers passed into lav* can be allocated any way you prefer,
           as long as they're aligned enough for the architecture, and
           they're freed appropriately (such as using av_free for buffers
           allocated with av_malloc) */
        video_outbuf_size = 200000;
        video_outbuf = av_malloc(video_outbuf_size);
    }

    /* allocate the encoded raw picture */
    picture = alloc_picture(c->pix_fmt, c->width, c->height);
    if (!picture) {
        fprintf(stderr, "Could not allocate picture
");
        exit(1);
    }

    /* if the output format is not YUV420P, then a temporary YUV420P
       picture is needed too. It is then converted to the required
       output format */
    tmp_picture = NULL;
    if (c->pix_fmt != PIX_FMT_YUV420P) {
        tmp_picture = alloc_picture(PIX_FMT_YUV420P, c->width, c->height);
        if (!tmp_picture) {
            fprintf(stderr, "Could not allocate temporary picture
");
            exit(1);
        }
    }
}
6.写入视频头
av_write_header(oc);
这一步非常重要,不能漏。
7.写入一帧帧的音视频数据
    for(;;)
    {
        if (audio_st)
            audio_pts = (double)audio_st->pts.val * audio_st->time_base.num / audio_st->time_base.den;
        else
            audio_pts = 0.0;

        if (video_st)
            video_pts = (double)video_st->pts.val * video_st->time_base.num / video_st->time_base.den;
        else
            video_pts = 0.0;

        if ((!audio_st || audio_pts >= STREAM_DURATION) &&
            (!video_st || video_pts >= STREAM_DURATION))
            break;

        /* write interleaved audio and video frames */
        if (!video_st || (video_st && audio_st && audio_pts < video_pts)) {
            write_audio_frame(oc, audio_st);
        } else {
            write_video_frame(oc, video_st);
        }
    }
音视频的pts和dts信息就是这个时候写入的。
8.写视频尾
av_write_trailer(oc);
这一步也很重要,虽然不是所有的视频文件都有尾部信息,但是这一步依然不能漏。
整个output-example.c差不多就是这些内容了,ffmpeg保存生成视频还是比较简单的,以后只需要根据这个例子改下就OK了。
最后附上根据output-example.c修改的例子,实现用YUV和PCM文件合成视频文件。
代码就不做解释了,自行下载查看吧。
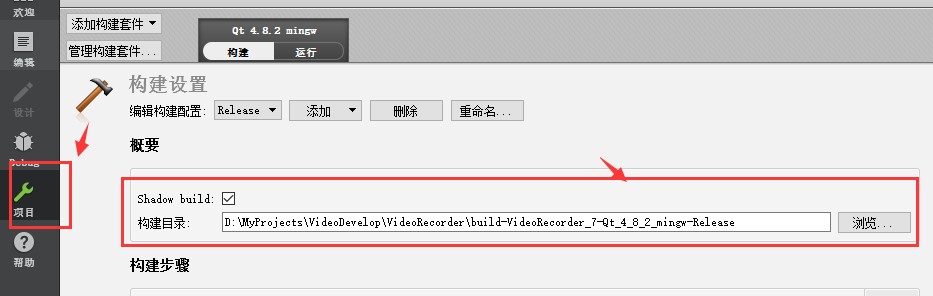
记得将工程目录下的in.pcm和in.yuv这2个文件拷贝到Qt的构建目录下:
构建目录就是如下所示的目录:
需要注意的是打开视频编码器和音频编码器的时候,设置的参数需要和输入的yuv和pcm一致;
工程提供的Yuv是176x144的,pcm是16bit,44100HZ,双声道的。
例子工程下载地址:http://download.csdn.net/download/qq214517703/9826315
学习音视频技术欢迎访问 http://blog.yundiantech.com
音视频技术交流讨论欢迎加 QQ群 121376426